
Intoduction
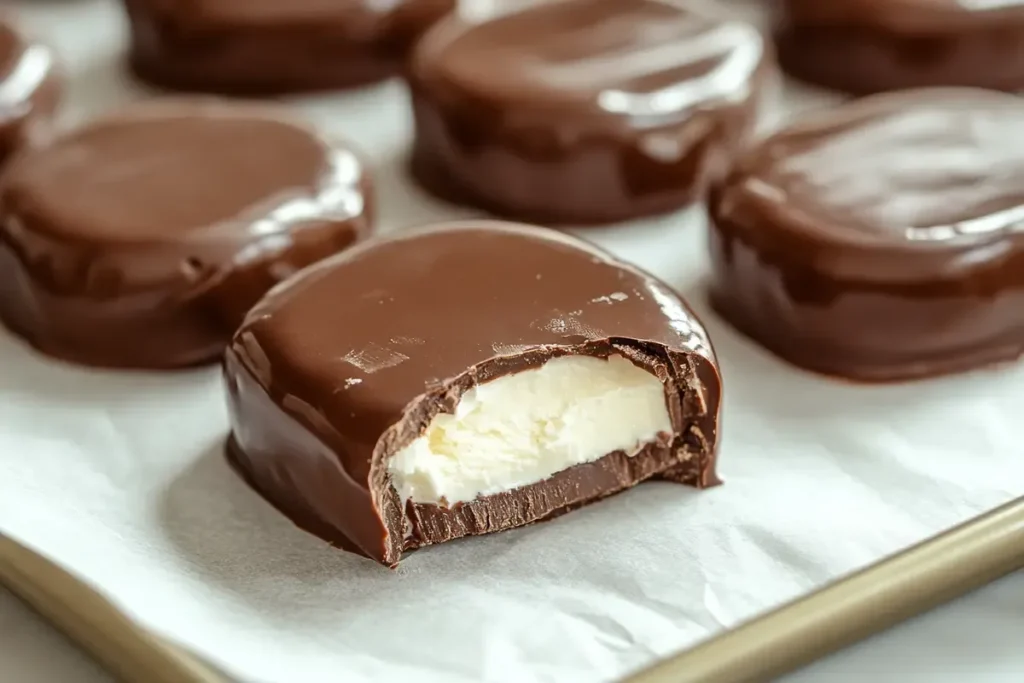
There’s something magical about biting into a homemade Eskimo Pie popsicle—that satisfying crunch of the chocolate shell followed by a smooth, creamy vanilla center. It’s the ultimate frozen treat, bringing back childhood memories while being surprisingly easy to make at home!
In this guide, we’ll explore everything you need to know about creating your own homemade Eskimo Pie popsicle, from its origins to the best ingredients and step-by-step instructions. Plus, we’ll share expert tips, nutritional facts, and common mistakes to avoid. Get ready to enjoy this chocolate-dipped delight in the comfort of your kitchen!
What Is a Homemade Eskimo Pie Popsicle?
History of the Eskimo Pie and Name Change
The Eskimo Pie was first introduced in 1921 as one of the first chocolate-covered ice cream bars in the U.S. It quickly became a household favorite, combining two beloved desserts—chocolate and ice cream—into one handheld treat.
However, in 2021, the name was officially changed to Edys Pie to be more culturally sensitive. Despite the name change, the treat remains the same: a creamy vanilla ice cream bar coated in a crispy chocolate shell. And the best part? You can make it at home with just a few ingredients!
Why Make Homemade Eskimo Pie Popsicles?
Sure, you could buy store-bought ice cream bars, but making your own homemade Eskimo Pie popsicle has several perks:
Better Ingredients: Control the quality by using organic vanilla, high-quality chocolate, and natural sweeteners.
Customizable Flavors: Add mix-ins like crushed nuts, caramel swirls, or even dairy-free options.
Fun and Easy: A great recipe for families, kids, or anyone who loves homemade desserts.
By making these popsicles yourself, you can enjoy a healthier, fresher, and tastier version of this classic treat!
Ingredients & Tools Needed
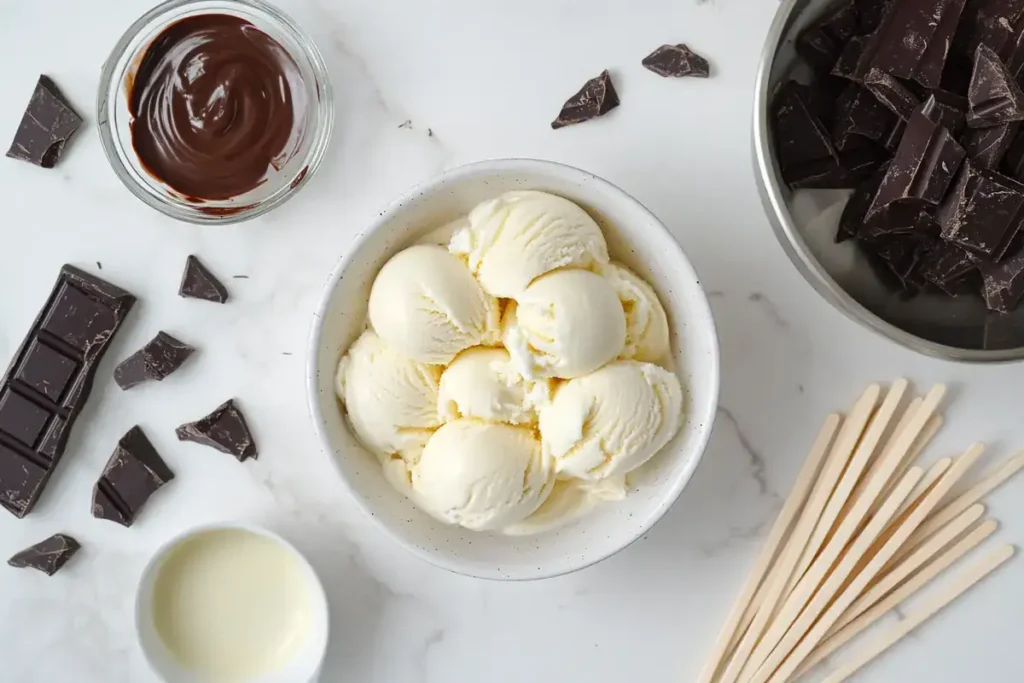
Before diving into the process of making your own homemade Eskimo Pie popsicle, let’s gather the right ingredients and tools. Having everything prepped in advance makes the process smoother and ensures the best results.
Essential Ingredients for the Perfect Popsicle
To make a classic homemade Eskimo Pie popsicle, you’ll need the following ingredients:
Vanilla Ice Cream (2 cups) – Choose a high-quality, creamy vanilla ice cream for the best texture. You can also use homemade ice cream for a richer taste.
Dark or Milk Chocolate (200g) – A good-quality chocolate (60%-70% cocoa) melts better and gives a smooth, crunchy shell.
Coconut Oil (2 tablespoons) – Helps create a thinner chocolate shell that cracks perfectly with each bite.
Popsicle Molds and Sticks – Essential for shaping your frozen treats.
Optional Add-ins: Crushed nuts, shredded coconut, or caramel drizzle for extra flavor.
Recommended Tools for Easy Preparation
Having the right tools makes crafting these chocolate-coated popsicles a breeze:
- Popsicle molds: Silicone molds make it easier to remove the frozen treats.
- Small saucepan: For melting chocolate to a silky consistency.
- Mixing bowl: For combining melted chocolate and coconut oil.
- Baking tray with parchment paper: To place the dipped popsicles while they harden.
Now that you have everything ready, it’s time to make your homemade Eskimo Pie popsicle step by step!
Step-by-Step Recipe – Homemade Eskimo Pie Popsicle
Making your own homemade Eskimo Pie popsicle is easier than you think! Just follow these simple steps, and soon you’ll be enjoying a delicious frozen treat.
Making the Creamy Vanilla Ice Cream Base
1️⃣ If using store-bought ice cream: Let it soften for about 5 minutes at room temperature before filling the molds.
2️⃣ For homemade ice cream: Blend 2 cups heavy cream, 1 cup whole milk, ½ cup sugar, and 1 teaspoon vanilla extract until smooth. Freeze for 2 hours before filling molds.
3️⃣ Fill the molds: Pour the ice cream mixture evenly into popsicle molds, making sure not to overfill.
4️⃣ Insert popsicle sticks: Gently place a stick into each mold, ensuring it’s centered.
5️⃣ Freeze for at least 4-6 hours: The longer, the better for a firm texture.
Freezing the Popsicles to the Perfect Texture
To get a smooth and creamy texture, make sure to:
Avoid over-churning (if using homemade ice cream).
Let the ice cream freeze completely before dipping in chocolate.
Keep molds in the coldest part of your freezer.
Preparing the Chocolate Coating
1️⃣ Melt the chocolate: In a small saucepan, gently melt the dark or milk chocolate over low heat, stirring continuously.
2️⃣ Add coconut oil: Stir in 2 tablespoons of coconut oil to create a glossy, smooth consistency.
3️⃣ Cool slightly: Let the melted chocolate sit for a couple of minutes before dipping the popsicles.
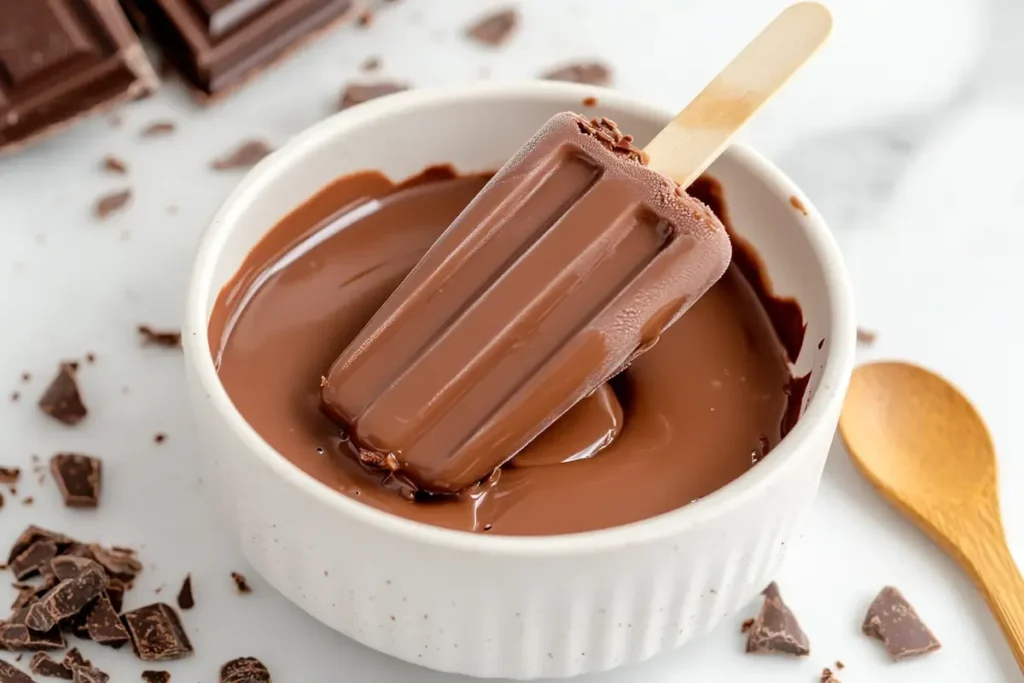
Dipping & Coating for That Classic Crunch
1️⃣ Unmold the frozen popsicles: Run warm water over the molds for a few seconds to release them easily.
2️⃣ Dip each popsicle into the melted chocolate: Hold the popsicle at the base and submerge it quickly for an even coat.
3️⃣ Let the excess chocolate drip off: Hold it over the bowl for a few seconds.
4️⃣ Add toppings (optional): Sprinkle with nuts or coconut before the chocolate sets.
5️⃣ Place on a parchment-lined tray and freeze for 10-15 minutes: This helps the chocolate shell firm up perfectly.
✨ Pro Tip: If you love an extra crunchy shell, double-dip the popsicles after the first layer hardens!
Nutritional Information
If you’re wondering whether a homemade Eskimo Pie popsicle can fit into your diet, the good news is that you can control the ingredients to make it healthier. Since this treat contains ice cream and chocolate, it’s naturally higher in fats and sugars, but there are ways to make a lighter version.
Healthier Substitutes for a Guilt-Free Treat
Want to enjoy a homemade Eskimo Pie popsicle with fewer calories? Here are a few tweaks:
Use Greek yogurt instead of ice cream for a high-protein, lower-fat option.
Opt for dark chocolate (70% or higher) for a richer taste with less sugar.
Sweeten naturally with honey or maple syrup instead of refined sugar.
Choose dairy-free ice cream for a plant-based version.
Nutritional Breakdown Per 100g
Here’s a general nutritional estimate for a standard homemade Eskimo Pie popsicle:
| Nutrient | Amount per 100g |
|---|---|
| Calories | 320 kcal |
| Protein | 4g |
| Fat | 22g |
| Carbohydrates | 28g |
| Sugar | 18g |
This can vary depending on the type of chocolate and ice cream you use. If you’re looking for a lower-calorie version, using unsweetened cocoa and light vanilla yogurt can help reduce overall sugar and fat content.
For more frozen treat recipes, check out our collection of delicious homemade desserts!
Expert Tips for the Best Homemade Eskimo Pie Popsicle
Making the perfect homemade Eskimo Pie popsicle isn’t just about following the recipe—it’s about knowing the little tricks that make a big difference. Here are some expert tips to ensure your popsicles turn out smooth, creamy, and delicious every time!
How to Prevent Ice Crystals for a Smooth Texture
One of the biggest problems with homemade popsicles is the formation of ice crystals, which can make the texture feel icy instead of creamy. To avoid this:
Use full-fat ingredients – Lower-fat options contain more water, which leads to iciness.
Cover the popsicles while freezing – A layer of plastic wrap can prevent excess moisture buildup.
Freeze quickly – Place popsicles in the coldest part of your freezer for faster freezing, which reduces ice crystals.
Choosing the Best Chocolate for the Outer Shell
The chocolate coating is what makes a homemade Eskimo Pie popsicle so special. But not all chocolate melts the same way!
Use high-quality chocolate (60% cocoa or more) – It melts smoother and has a richer taste.
Add coconut oil – This creates a thinner, snappier shell that cracks when you bite into it.
Double-dip for extra crunch – Let the first layer set before dipping again for a thicker coating.
✨ Pro Tip: If you love a little crunch, roll the dipped popsicle in crushed almonds or shredded coconut before the chocolate sets!
Now that you know all the secrets, you’re ready to make the ultimate homemade Eskimo Pie popsicle. Would you like me to continue with Part 6: FAQs? 😊
FAQs
If you still have questions about making a homemade Eskimo Pie popsicle, you’re not alone! Here are answers to some of the most common questions people ask.
How Do You Make Popsicles Creamy and Not Icy?
The key to making a homemade Eskimo Pie popsicle smooth and creamy is using the right ingredients. Avoid using low-fat milk or water-based ice cream mixtures, as they create an icy texture. Instead, opt for:
Full-fat dairy – Whole milk, heavy cream, or Greek yogurt for a rich texture.
Corn syrup or honey – These natural sweeteners prevent large ice crystal formation.
Quick freezing – The faster the popsicles freeze, the smoother they’ll be.
What Is Eskimo Pie Called Now?
The original Eskimo Pie was renamed Edys Pie in 2021. The recipe remains the same, but the name was changed to be more culturally appropriate. Despite the change, people still love making this classic chocolate-coated treat at home!
What Happened to Eskimo Pie Ice Cream Bars?
Eskimo Pie ice cream bars are still available under their new name. Many brands also make similar chocolate-covered ice cream bars, but nothing beats the taste of a homemade Eskimo Pie popsicle!
What Ingredient Makes Popsicles Soft?
To get a softer, creamy texture instead of a hard, icy popsicle, you can add:
Coconut milk or condensed milk – Adds richness and prevents iciness.
A pinch of cornstarch – Helps stabilize the ice cream base.
Blended banana or avocado – Natural thickening agents for a smooth mouthfeel.
Final Thoughts – Why You Should Try Homemade Eskimo Pie Popsicles
Making your own homemade Eskimo Pie popsicle isn’t just fun—it’s a delicious way to enjoy a classic frozen treat with better ingredients. When you make them at home, you control everything from the quality of chocolate to the sweetness of the ice cream.
The Joy of Homemade Treats
There’s something special about creating your own desserts. Whether you’re making these popsicles for a summer party, a family treat, or just because you love chocolate, they’re sure to bring smiles all around. Plus, they store well in the freezer, so you can enjoy them anytime!
Customize Your Popsicles
Want to switch it up? Try these variations:
Chocolate Peanut Butter: Add a swirl of peanut butter to the ice cream.
Mint Chocolate: Use mint extract in the ice cream and dip in dark chocolate.
Strawberry Crunch: Mix crushed freeze-dried strawberries into the chocolate coating.
Now that you have all the tips and tricks, it’s time to make your own homemade Eskimo Pie popsicle! Grab your ingredients, follow the steps, and enjoy a nostalgic frozen delight.
Storing and Serving Homemade Eskimo Pie Popsicles
Once you’ve made your delicious homemade Eskimo Pie popsicle, you’ll want to store them properly to keep them fresh and ready to enjoy anytime.
Best Way to Store Your Popsicles
To keep your homemade Eskimo Pie popsicle tasting as fresh as possible, follow these simple storage tips:
Wrap individually: After the chocolate shell sets, wrap each popsicle in parchment or wax paper.
Use an airtight container: Place wrapped popsicles in a freezer-safe container to prevent freezer burn.
Keep in the coldest part of the freezer: This helps maintain their creamy texture and prevents melting and refreezing.
Store for up to 2 months: While they’re best enjoyed fresh, they’ll stay good for several weeks if properly sealed.
How to Serve for the Best Experience
Serving your homemade Eskimo Pie popsicle is as easy as grabbing one from the freezer, but here are some ways to enhance your treat:
Let it sit for 2 minutes: This softens the chocolate slightly, making it easier to bite into.
Drizzle with extra chocolate or caramel: Adds even more flavor and texture.
Pair with fresh fruit or whipped cream: A fun way to elevate this classic treat.
Now that you know how to store and serve them, let’s look at some final thoughts on why making these at home is worth it!
Why You Should Try Homemade Eskimo Pie Popsicles
Making a homemade Eskimo Pie popsicle is more than just a fun kitchen project—it’s a way to enjoy a classic treat with fresher, healthier ingredients.
The Homemade Advantage
When you make these popsicles yourself, you get:
Better ingredients: No artificial flavors or preservatives.
ustomization: Choose your favorite chocolate, mix-ins, and ice cream base.
A fun activity: Great for family bonding, kids, and dessert lovers!
Final Thoughts
There’s nothing quite like the combination of crispy chocolate and creamy vanilla in a homemade Eskimo Pie popsicle. Whether you’re making them for a party, a sweet summer snack, or just because you love frozen desserts, they’re sure to be a hit.